![]() This article is an udpated version of my previous article on the same topic. The reason being because Ubuntu/Kubuntu changed enough recently, the old configuration no longer worked and this warranted a new write-up. This howto was tested in Kubuntu 10.04 (lucid).
This article is an udpated version of my previous article on the same topic. The reason being because Ubuntu/Kubuntu changed enough recently, the old configuration no longer worked and this warranted a new write-up. This howto was tested in Kubuntu 10.04 (lucid).
Change Summary
The following are the major cause for changes from the previous article.
- Ubuntu/Kubuntu has not included the requisite package unionfs-tools since 8.04 (hardy)
- timeoutd no longer detected user timeouts. I’m not sure when or how this changed, but idle time is not reported in /var/run/utmp, which timeoutd relies upon for idle time collection. If you know what happened here please leave information in the comments. Actually, timeoutd wasn’t ideal for this project so replacing it ended up being an improvement.
The following is how to create a relatively secure internet kiosk using Kubuntu. We assume we are able to relatively trust our users with the computers and the network. If you have to deal with malicious users you may want to add more precautions. I am not a security expert so likely have not considered all the avenues for abuse.
Configuration Methodology
The methodology should be to perfect the kiosk as much as possible on one machine (or a VM) first, then clone that machine to all your other computers, changing hostnames where appropriate.
Configuration Instructions
Step 1: Partitions
The crux of this design is ensuring that any changes to the kiosk user home directory are wiped out after the user logs out. For this we union mount a writable tmpfs on top of a read-only template. This is pretty convenient because anytime you want to change the user template, you simply mount the read-only partition as writable, make your changes, and revert the filesystem scheme. Here is my partition scheme: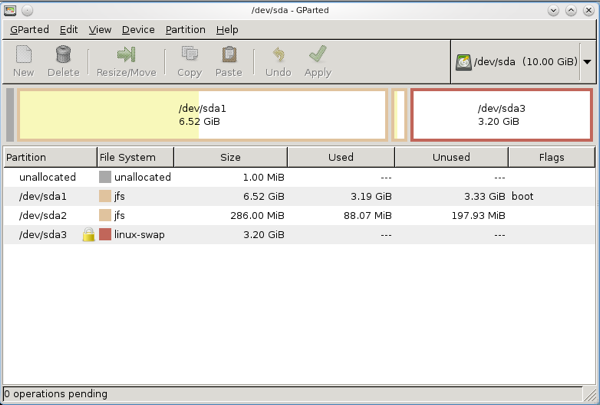
Figure 1: Kiosk Partitions
/dev/sda1 is mounted at /, and contains only system files.
/dev/sda2 is the read-only user template. This only needs to be large enough to contain your template files. Mounted at /kiosk-ro
/dev/sda3 is swap. Along with RAM, this is the user writable space; increase this for more user space. Combined with RAM, this will be mounted at /kiosk-rw via tmpfs
The hard drive is small because this is a VM, but you can expand your partitions to any size you like. The good thing about internet kiosks is that they typically need hardly any space. A 10GB drive would suffice for many kiosks. You don’t need to use jfs; you can use your fs of choice.
Step 2: Boot from the new Kiosk, install required packages
To create a machine which is compatible with media technologies users are familiar with (certain codecs, flash), edit sources.list and make sure universe, multiverse, and restricted sources are being read. Then do a:
sudo apt-get install firefox openssh-server kubuntu-restricted-extras flashplugin-nonfree ntp openoffice.org unionfs-fuse xautolock
I’d also recommend installing Google Chrome. Install any other applications you or your users want.
Step 3: Create the Kiosk user
sudo useradd kiosk
Set the password to something long and random, eg:
Q5w?47yK&=Asa&mB4g&658tE=BZWZ$KUV2_6c+R#_J9kb462m7v7zNKvNWpe5LWj
Keep this password hidden from the users. This way they don’t have access to change their password or remotely log in.
Give kiosk user access to the cdrom, audio, and hot pluggable devices (eg thumbdrives):sudo usermod -G plugdev,cdrom,audio kiosk
Step 4: Setup your filesystem
sudo mkdir /kiosk-ro
sudo mkdir /kiosk-rw
Setup your fstab, here is mine:
# /etc/fstab: static file system information.
#
# <file system> <mount point>   <type>  <options>       <dump>  <pass>
proc            /proc           proc    defaults        0       0
# /dev/sda1
UUID=d49413fa-a1cb-4677-8ddc-1418a385102d /               jfs     defaults,errors=remount-ro 0       1
# /dev/sda2
UUID=b50fed0f-15c8-4b02-9faf-21105e2d7acd /kiosk-ro        jfs     defaults,ro        0       2
# /dev/sda3
UUID=f63af8ab-f085-4a61-b2dc-195366e60e68 none            swap    sw              0       0
/dev/scd0       /media/cdrom0   udf,iso9660 user,noauto,exec 0       0
Step 5: Setup your template kiosk home directory
sudo umount /kiosk-ro
sudo mount /dev/sda2 /home/kiosk
Login as the kiosk user. Setup the menu, wallpaper, screen saver, auto-start programs, install firefox add-ons, make desktop shortcuts, etc. When the kiosk user logs out, the settings will always revert to how you’ve set them in this step.
When you are done
sudo umount /home/kiosk
sudo mount /kiosk-ro
You can always return to this step later if you want to make changes to your read-only template. You might have to temporarily disable some of the configuration in step 6 if you do, though.
Step 6: Configure KDE to behave as a kiosk
Make KDE auto-login as user kiosk - when the machine reboots it will already log in as kiosk. Edit /etc/kde4/kdm/kdmrc and modify these values:AutoLoginEnable=true
AutoLoginAgain=true
AutoLoginUser=kiosk
Next, edit /etc/kde4/kdm/Xstartup and put these lines near the top:
logger "mounting tmpfs at /kiosk-rw"
mount -t tmpfs -o uid=kiosk,mode=755 tmpfs /kiosk-rw

logger "mounting unionfs at /home/kiosk"
unionfs-fuse -o default_permissions,cow,max_files=32768,allow_other,use_ino,nonempty /kiosk-rw=RW:/kiosk-ro=RO /home/kiosk
And this near the bottom, where in this example there is a 5 minute idle logout, and a 1 minute warning before logout:
xautolock -secure -time 5 -locker "logger \"Idle auto-logout triggered\" && killall -u kiosk" -notify 60 -notifier "logger \"Notifying user of impending auto-logout\" && xmessage -center -timeout 60 'IDLE WARNING: Auto logout in 1 minute. Do anything to cancel auto-logout.'" &
And /etc/kde4/kdm/Xreset:
logger "unmounting /home/kiosk"
fusermount -uz /home/kiosk
logger "unmounting /kiosk-rw"
umount -fl /kiosk-rw

killall xautolock
find /tmp -user kiosk -delete
Towards the top of /etc/kde4/kdm/Xsession:
xhost +local:root
This allows root to attach X programs to the kiosk user’s display without worrying about X authentication. This is important for how we are using xautolock and xmessage.
Step 7: Disable alternative logins
Users will be able to exploit alternative logins (ie anything that spawns new processes) to exploit accounts of following users. Two of which will be vulnerable by default are crontab and ssh. Leave a comment if I’ve forgotten any. Remember, if you’re installing additional packages you may have to secure those too.
crontab access will allow a malicious kiosk user to exploit accounts of those who use the machine after her. So disable crontab for the kiosk user:
echo 'kiosk' | sudo tee -a /etc/cron.deny
Disallow the user to ssh in with a public key they’ve set or any other authentication method by disabling logins from them entirely
Edit /etc/ssh/sshd_config and add this line:
DenyUsers kiosk
While you’re in there, disable root logins too:
PermitRootLogin no
Step 8: Tie the kiosk machine into your infrastructure
Install your ssh-keys into the admin account on the kiosk machine so you have instant ssh access. You could setup syslog-ng for centralized logging, cfengine/puppet for management, or all the plethora of possibilities which are possible with debian/ubuntu packages.Step 9: Cloning your kiosk machine
This is a full block-by-block copy so it works best if you have a gigabit switch. All you have to do is boot both your master copy and target from a linux boot CD (ubuntu works fine). Turn on the ssh daemon on the target machine. From the master copy type:sudo dd if=/dev/sda | ssh -t $destinationIp sudo dd of=/dev/sda
Go read a few chapters of a book or surf the web, after several hours it will be done. You can open up “top” on the target machine to make sure progress is being made.
If you don’t need ssh encryption you can use a much faster option to bypass ssh encryption overhead. Run linux boot CDs on both your source (original kiosk) and target (destination kiosk) machines.
On the target machine run:sudo su #become root
nc -l 9999 > /dev/sda
On the source machine run:sudo dd if=/dev/sda | nc $destinationIp 9999
Step 10: Further Security Considerations
I’m pretty comfortable with how locked down this system is for largely trustable users - but malicious users will be able to find some ways around the safeguards. Perhaps more importantly, you still need to watch out for users physically installing keyloggers to capture information of later users. Keeping the workstation and its connections inside a locked cage/box is a good way to deter keylogging.
As with any system, keep your software up-to-date. I recommend unattended upgrades.
Update: 10-14-2010 SANS ISC has a great diary entry about securing kiosk machines
Comments
comments powered by Disqus